はじめに
前回、ASP.NETでWebGLやThree.jsを使う記事を投稿しました。
今回はそれの応用で、UnityのHLSLで作っていたシェーダーをThree.jsに移行してみます。
また作ったサイトをGitHub Pagesを使って公開するところまでやっていこうと思います。
今回作成したページはここで公開しているので、ぜひ実際に動いているところを見てみてください。
Three_VAT
今回やること
今回は、VAT(Vertex Animation Texture)をやっていきます。
簡単に言えば、時系列ごとに各頂点の位置を保存しておくことで、滑らかなアニメーションができる技術です。
単純な数値データではなくテクスチャを用いることでGPUで処理できるようになり、非常に高速に処理できます。
Three.jsではアニメーション再生にも対応しているようですが、布や流体のシミュレーションには直接対応していません。
Alembic拡張子にも対応していないようで、glTFやFBXではボーンアニメーションやブレンドシェープしかできないようです。
なので今回のVAT開発はそれなりに意義のあるものだと思います。
またVATデータに関してはBlenderを用いて、自作プラグインで作成しました。
事前準備
プロジェクト作成
プロジェクトの種類は前回と同様、「Blazor WebAssemblyスタンドアロンアプリ」で.NET 9.0で開発していきます。
まず最初に、VATに必要な技術が使用できるか確認していきます。
大きく分けて以下が確認できれば良さそうです。
- EXR形式画像の読み込み
- FBXモデルのUV座標
そのための画面を作成していきます。
プログラム
まず必要になるパッケージを記述していきます。
wwwroot/index.html
...
<script src="_framework/blazor.webassembly.js"></script>
<!-- Three.js 本体 (CDN) -->
<script src="https://unpkg.com/three@0.128.0/build/three.min.js"></script>

<!-- ★★★ FBXローダーと、その依存ライブラリを追加 ★★★ -->
<script src="https://unpkg.com/three@0.128.0/examples/js/libs/fflate.min.js"></script>
<script src="https://unpkg.com/three@0.128.0/examples/js/loaders/FBXLoader.js"></script>

<script src="https://unpkg.com/three@0.128.0/examples/js/loaders/EXRLoader.js"></script>

<!-- ★★★ OrbitControls を追加 ★★★ -->
<script src="https://unpkg.com/three@0.128.0/examples/js/controls/OrbitControls.js"></script>

<!-- JS Interop用のファイル -->
<script src="js/model-viewer.js"></script>
...
EXR画像読み込み
wwwroot/js/texture-inspector.js
// wwwroot/js/texture-inspector.js

let textureData = null;
let textureWidth = 0;
let textureHeight = 0;
let dotNetHelper = null;

// テクスチャを読み込み、プレーンに貼り付けて表示する
export function initTextureInspector(canvasId, texturePath, helper) {
    dotNetHelper = helper;
    const canvas = document.getElementById(canvasId);
    if (!canvas) return;

    const scene = new THREE.Scene();
    scene.background = new THREE.Color(0xf0f0f0);

    const camera = new THREE.OrthographicCamera(-0.5, 0.5, 0.5, -0.5, 0.1, 10);
    camera.position.z = 1;

    const renderer = new THREE.WebGLRenderer({ canvas: canvas });

    const loader = new THREE.EXRLoader();
    loader.load(texturePath, (texture) => {
        // テクスチャのフィルタリングをNearestに設定して、ピクセルがぼやけないようにする
        texture.magFilter = THREE.NearestFilter;
        texture.minFilter = THREE.NearestFilter;

        // テクスチャのデータを保持
        textureData = texture.image.data;
        textureWidth = texture.image.width;
        textureHeight = texture.image.height;

        console.log(`Texture loaded: ${textureWidth} x ${textureHeight}`);

        // レンダラーのサイズはテクスチャの解像度に合わせる
        renderer.setSize(textureWidth, textureHeight);
        // キャンバスの表示サイズを5倍にする
        const displayWidth = textureWidth * 5;
        const displayHeight = textureHeight * 5;
        canvas.style.width = `${displayWidth}px`;
        canvas.style.height = `${displayHeight}px`;

        const geometry = new THREE.PlaneGeometry(1, 1);
        const material = new THREE.MeshBasicMaterial({ map: texture });
        const plane = new THREE.Mesh(geometry, material);
        scene.add(plane);

        renderer.render(scene, camera);
    });

    // キャンバスのクリックイベント
    canvas.addEventListener('click', (event) => {
        if (!textureData) return;

        const rect = canvas.getBoundingClientRect();
        // 表示上のクリック座標
        const x = event.clientX - rect.left;
        const y = event.clientY - rect.top;

        // 表示サイズとテクスチャ解像度の比率を計算
        const scaleX = textureWidth / rect.width;
        const scaleY = textureHeight / rect.height;

        // テクスチャ座標に変換
        const uvX = Math.floor(x * scaleX);
        const uvY = Math.floor(y * scaleY);

        if (uvX >= 0 && uvX < textureWidth && uvY >= 0 && uvY < textureHeight) {
            getPixelValue(uvX, uvY);
        }
    });
}

// 指定された座標のピクセル値を取得して.NETに渡す
function getPixelValue(x, y) {
    if (!textureData || !dotNetHelper) return;

    // Y座標を反転させる(テクスチャの原点は左下)
    const invertedY = textureHeight - 1 - y;
    const index = (invertedY * textureWidth + x) * 4;

    const r = textureData[index];
    const g = textureData[index + 1];
    const b = textureData[index + 2];
    const a = textureData[index + 3];

    // .NET側のメソッドを呼び出す
    dotNetHelper.invokeMethodAsync('SetPixelValue', x, y, r, g, b, a);
}
Pages/TextureInspector.razor
@page "/texture-inspector"
@inject IJSRuntime JSRuntime
@implements IAsyncDisposable

<h3>EXRテクスチャ インスペクター</h3>
<p>キャンバスをクリックして、その地点のピクセル値(RGBA)を取得します。</p>

<div class="row">
    <div class="col-md-8">
        <canvas id="texture-canvas" style="width: 100%; border: 1px solid #ccc;"></canvas>
    </div>
    <div class="col-md-4">
        <h5>ピクセル情報</h5>
        <p>
            座標: (@_pixelX, @_pixelY)
        </p>
        <p>
            <strong>R:</strong> @_pixelValueR<br />
            <strong>G:</strong> @_pixelValueG<br />
            <strong>B:</strong> @_pixelValueB<br />
            <strong>A:</strong> @_pixelValueA
        </p>
        <p>
            <small>※テクスチャのサイズはコンソールに出力されます。</small>
        </p>
    </div>
</div>

@code {
    private int _pixelX;
    private int _pixelY;
    private float _pixelValueR;
    private float _pixelValueG;
    private float _pixelValueB;
    private float _pixelValueA;

    private IJSObjectReference? _module;
    private DotNetObjectReference<TextureInspector>? _dotNetHelper;

    protected override async Task OnAfterRenderAsync(bool firstRender)
    {
        if (firstRender)
        {
            _dotNetHelper = DotNetObjectReference.Create(this);
            _module = await JSRuntime.InvokeAsync<IJSObjectReference>("import", "./js/texture-inspector.js");
            await _module.InvokeVoidAsync("initTextureInspector", "texture-canvas", "textures/Cube_pos.exr", _dotNetHelper);
        }
    }

    [JSInvokable]
    public void SetPixelValue(int x, int y, float r, float g, float b, float a)
    {
        _pixelX = x;
        _pixelY = y;
        _pixelValueR = r;
        _pixelValueG = g;
        _pixelValueB = b;
        _pixelValueA = a;
        StateHasChanged();
    }

    async ValueTask IAsyncDisposable.DisposeAsync()
    {
        if (_module is not null)
        {
            await _module.DisposeAsync();
        }
        _dotNetHelper?.Dispose();
    }
}
UV座標リスト
wwwroot/js/uv-list.js
// wwwroot/js/uv-list.js

let uv1, uv2;

// モデルを読み込み、UVデータをキャッシュする
export function init(modelPath) {
    return new Promise((resolve, reject) => {
        const loader = new THREE.FBXLoader();
        loader.load(modelPath, (fbx) => {
            let meshFound = false;
            fbx.traverse((child) => {
                if (child.isMesh) {
                    meshFound = true;
                    console.log(`Mesh found in ${modelPath}:`, child.name);

                    // UVデータを取得・キャッシュ
                    const geometry = child.geometry;
                    uv1 = geometry.attributes.uv ? geometry.attributes.uv.array : new Float32Array();
                    uv2 = geometry.attributes.uv2 ? geometry.attributes.uv2.array : new Float32Array();

                    console.log(`UVMap (uv) found: ${uv1.length / 2} vertices`);
                    console.log(`VertexUV (uv2) found: ${uv2.length / 2} vertices`);
                }
            });

            if (!meshFound) {
                console.warn(`No mesh found in ${modelPath}`);
                uv1 = new Float32Array();
                uv2 = new Float32Array();
            }
            resolve();
        }, undefined, (error) => {
            console.error(`Error loading ${modelPath}:`, error);
            uv1 = new Float32Array();
            uv2 = new Float32Array();
            reject(error);
        });
    });
}

// 要求されたUVセットのデータをBlazorが受け取れる形式で返す
export function getUvData(uvSetIndex) {
    const sourceArray = (uvSetIndex === 1) ? uv2 : uv1;
    if (!sourceArray || sourceArray.length === 0) {
        return [];
    }

    const result = [];
    for (let i = 0; i < sourceArray.length; i += 2) {
        result.push([sourceArray[i], sourceArray[i + 1]]);
    }
    return result;
}
Pages/UvList.razor
@page "/uv-list"
@inject IJSRuntime JSRuntime
@implements IAsyncDisposable

<h3>UV座標リスト</h3>

<div class="row">
    <div class="col-md-4">
        <h5>設定</h5>
        <div class="mb-3">
            <label for="model-select" class="form-label">モデル</label>
            <select id="model-select" class="form-select" @onchange="OnModelChange">
                <option value="models/Cube.fbx" selected>Cube.fbx</option>
                <option value="models/FBX_HQ.fbx">FBX_HQ.fbx</option>
            </select>
        </div>
        <div class="mb-3">
            <label class="form-label">UVセット</label>
            <div class="form-check">
                <input class="form-check-input" type="radio" name="uvSet" id="uvmap1" value="0" @onchange="OnUvSetChange" checked />
                <label class="form-check-label" for="uvmap1">UVMap (uv)</label>
            </div>
            <div class="form-check">
                <input class="form-check-input" type="radio" name="uvSet" id="uvmap2" value="1" @onchange="OnUvSetChange" />
                <label class="form-check-label" for="uvmap2">VertexUV (uv2)</label>
            </div>
        </div>
    </div>
    <div class="col-md-8">
        <h5>座標データ (@_uvCoords.Count 件)</h5>
        <div style="height: 400px; overflow-y: auto; border: 1px solid #ccc;">
            @if (_isLoading)
            {
                <p><em>Loading...</em></p>
            }
            else
            {
                <table class="table table-sm table-striped">
                    <thead>
                        <tr>
                            <th>#</th>
                            <th>U</th>
                            <th>V</th>
                        </tr>
                    </thead>
                    <tbody>
                        @for (var i = 0; i < _uvCoords.Count; i++)
                        {
                            var (u, v) = _uvCoords[i];
                            <tr>
                                <td>@i</td>
                                <td>@u.ToString("F6")</td>
                                <td>@v.ToString("F6")</td>
                            </tr>
                        }
                    </tbody>
                </table>
            }
        </div>
    </div>
</div>

@code {
    private IJSObjectReference? _module;
    private string _selectedModel = "models/Cube.fbx";
    private int _selectedUvSet = 0;
    private bool _isLoading = true;
    private List<(float u, float v)> _uvCoords = new();

    protected override async Task OnAfterRenderAsync(bool firstRender)
    {
        if (firstRender)
        {
            _module = await JSRuntime.InvokeAsync<IJSObjectReference>("import", "./js/uv-list.js");
            await LoadModelAndUvs();
        }
    }

    private async Task LoadModelAndUvs()
    {
        if (_module is null) return;

        _isLoading = true;
        StateHasChanged();

        await _module.InvokeVoidAsync("init", _selectedModel);
        await FetchUvData();

        _isLoading = false;
        StateHasChanged();
    }

    private async Task FetchUvData()
    {
        if (_module is null) return;
        _uvCoords.Clear();
        var coords = await _module.InvokeAsync<List<float[]>>("getUvData", _selectedUvSet);
        if (coords != null)
        {
            foreach (var c in coords)
            {
                _uvCoords.Add((c[0], c[1]));
            }
        }
    }

    private async Task OnModelChange(ChangeEventArgs e)
    {
        _selectedModel = e.Value?.ToString() ?? "";
        if (!string.IsNullOrEmpty(_selectedModel))
        {
            await LoadModelAndUvs();
        }
    }

    private async Task OnUvSetChange(ChangeEventArgs e)
    {
        _selectedUvSet = int.Parse(e.Value?.ToString() ?? "0");
        _isLoading = true;
        await FetchUvData();
        _isLoading = false;
        StateHasChanged();
    }

    async ValueTask IAsyncDisposable.DisposeAsync()
    {
        if (_module is not null)
        {
            await _module.DisposeAsync();
        }
    }
}
実行
EXR画像読み込み
キャンバス内でクリックした座標のテクスチャの情報を表示するページです。
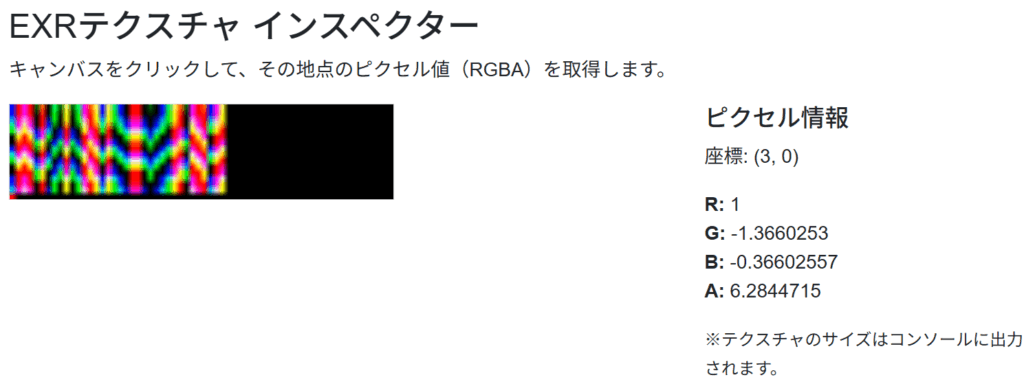
通常のpng画像では0~1の255段階なのですが、EXRでは浮動小数の値が入ります。
座標(3, 0)をクリックしてみると、GやBの値がマイナスになっていたり、Aの値が1を超えています。
ちゃんとEXR形式の画像も読みこめるようですね。
UV座標リスト
FBXファイルに保存されているUVの値をリスト表示するページです。

今回のモデルではUVが2種類保存されており、それぞれちゃんと設定した値が読み出せていることがわかりました。
布シミュレーション
プログラム
wwwroot/js/model-viewer.js
// wwwroot/js/vat-minimal-fbx.js

// グローバルスコープで変数を宣言し、関数間で共有できるようにする
let vatMaterial;
let clock;

// シーンを初期化する
window.initVatMinimalSceneFbx = async (canvasId, modelPath, posTexturePath, maxMotion) => {
    const canvas = document.getElementById(canvasId);
    if (!canvas) return;

    // --- シーンとカメラ、レンダラー ---
    const scene = new THREE.Scene();
    scene.background = new THREE.Color(0x333333);
    const camera = new THREE.PerspectiveCamera(75, canvas.clientWidth / canvas.clientHeight, 0.1, 1000);
    camera.position.z = 5;
    const renderer = new THREE.WebGLRenderer({ canvas: canvas });
    renderer.setSize(canvas.clientWidth, canvas.clientHeight);

    // グローバル変数を初期化
    clock = new THREE.Clock();

    // OrbitControlsの初期化
    const controls = new THREE.OrbitControls(camera, renderer.domElement);

    // --- アセットの読み込み ---
    const [fbx, posTexture] = await Promise.all([
        new THREE.FBXLoader().loadAsync(modelPath),
        new THREE.EXRLoader().loadAsync(posTexturePath)
    ]);

    // ★★★ フィルタリング設定(歪み防止) ★★★
    posTexture.magFilter = THREE.NearestFilter;
    posTexture.minFilter = THREE.NearestFilter;

    // --- カスタムマテリアルの作成 ---
    // グローバル変数にマテリアルを代入
    vatMaterial = new THREE.MeshBasicMaterial({
        color: 0x00ff00,
        wireframe: true
    });

    // Uniform変数を定義
    vatMaterial.userData.uniforms = {
        u_time: { value: 0.0 },
        u_posTexture: { value: posTexture },
        u_maxMotion: { value: maxMotion },
        u_fps: { value: 30.0 },
        u_texSize: { value: new THREE.Vector2(posTexture.image.width, posTexture.image.height) }
    };

    // onBeforeCompileで頂点シェーダーを書き換える
    vatMaterial.onBeforeCompile = (shader) => {
        shader.uniforms.u_time = vatMaterial.userData.uniforms.u_time;
        shader.uniforms.u_posTexture = vatMaterial.userData.uniforms.u_posTexture;
        shader.uniforms.u_maxMotion = vatMaterial.userData.uniforms.u_maxMotion;
        shader.uniforms.u_fps = vatMaterial.userData.uniforms.u_fps;
        shader.uniforms.u_texSize = vatMaterial.userData.uniforms.u_texSize;

        shader.vertexShader = `
            uniform float u_time;
            uniform sampler2D u_posTexture;
            uniform float u_maxMotion;
            uniform float u_fps;
            uniform vec2 u_texSize;

            attribute vec2 uv2; // 追加

            ${shader.vertexShader}
        `.replace(
            `#include <begin_vertex>`,
            `
            float motion = mod(u_time * u_fps, u_maxMotion);
            float currentFrame = floor(motion);
            vec2 currentUv = uv2; // 変更

            float column = 4.0f;
            float frameHeightInPixels = column / u_texSize.y;
            currentUv.y += currentFrame * frameHeightInPixels;

            vec3 pos = texture2D(u_posTexture, currentUv).rgb;
            vec3 transformed = pos;
            `
        );
    };

    // --- モデルにマテリアルを適用 ---
    const model = fbx;
    model.traverse((child) => {
        if (child.isMesh) {
            child.material = vatMaterial;
        }
    });

    // モデルが中央に来るように調整
    const box = new THREE.Box3().setFromObject(model);
    const center = box.getCenter(new THREE.Vector3());
    model.position.sub(center);
    scene.add(model);

    // カメラをモデル全体が映るように自動調整
    const size = box.getSize(new THREE.Vector3());
    const maxDim = Math.max(size.x, size.y, size.z);
    const fov = camera.fov * (Math.PI / 180);
    camera.position.z = Math.abs(maxDim / Math.tan(fov / 2));
    camera.position.z *= 1.5; // 少し離れる
    camera.lookAt(model.position);
    controls.target.copy(model.position); // 注視点も合わせる
    controls.update();

    // --- アニメーションループを開始 ---
    animate(renderer, scene, camera, controls);
};

// ★★★ animate関数を分離し、必要なものを引数で渡す ★★★
function animate(renderer, scene, camera, controls) {
    requestAnimationFrame(() => animate(renderer, scene, camera, controls));

    // vatMaterialが初期化済みかチェックしてからアクセスする
    if (vatMaterial && clock) {
        vatMaterial.userData.uniforms.u_time.value += clock.getDelta();
    }

    controls.update();
    renderer.render(scene, camera);
}
Pages/ModelViewer.razor
@page "/ModelViewer"
@inject IJSRuntime JSRuntime

<h3>Minimal VAT Viewer (FBX)</h3>

<p>A static FBX model animated by a position texture.</p>

<canvas id="vat-minimal-fbx-canvas" width="800" height="600" style="border: 1px solid black;"></canvas>

@code {
    protected override async Task OnAfterRenderAsync(bool firstRender)
    {
        if (firstRender)
        {
            float frame = 250.0f;

            await JSRuntime.InvokeVoidAsync("initVatMinimalSceneFbx",
                "vat-minimal-fbx-canvas",
                "models/FBX_HQ.fbx",
                "textures/TEX_HQ_dynamic_pos.exr",
                frame
                );
        }
    }
}
実行
こちらはスクリーンショットですが、実行したら実際に布がはためいている様が見えます。
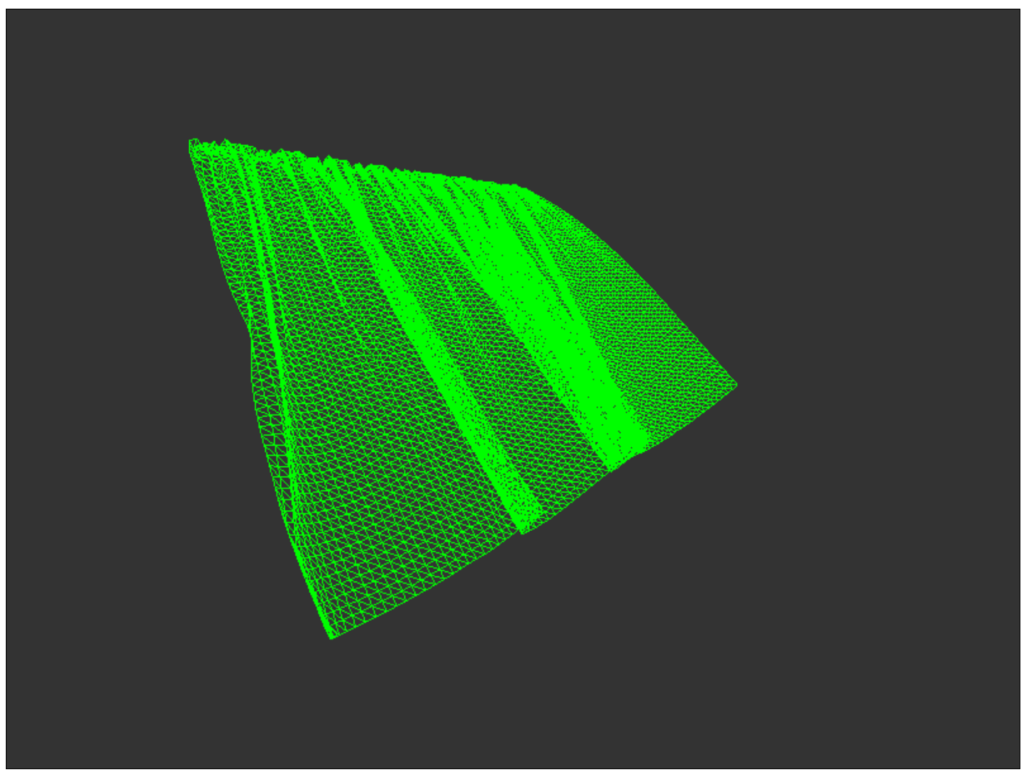
vertexShaderで経過時間に応じてUVを動かしているのがVATの核心ですね。
陰影処理
続いて陰影を作っていきます。
この処理ではビット演算を行っていて、Web1.0では再現できないと言われました。
まあ最近のWebブラウザなら大丈夫だろうということで取り入れていきます。
プログラム
wwwroot/js/cloth-vat-viewer.js
// wwwroot/js/cloth-vat-viewer.js

(function () {
    // Scope variables
    let clock;
    let scene; // Make scene accessible to the switcher function
    let animationFrameId; // To cancel the animation frame

    // HLSL's NormalUnpack in GLSL for WebGL 2.0
    const normalUnpack = () => {
        // This function will be inlined into the shader string
        return `
            vec3 normalUnpack(float v) {
                uint ix = floatBitsToUint(v);
                float r = float((ix >> 16) & 0xFFu) / 255.0;
                float g = float((ix >> 8)  & 0xFFu) / 255.0;
                float b = float( ix        & 0xFFu) / 255.0;
                return vec3(r, g, b) * 2.0 - 1.0;
            }
        `;
    };

    // Custom Vertex Shader (VAT位置と法線アニメーション版 - uv2対応)
    const customVertexShader = () => `
        uniform float u_time;
        uniform sampler2D u_posTexture;
        uniform float u_maxMotion;
        uniform float u_fps;
        uniform vec2 u_texSize;
        uniform float u_column;
        uniform bool u_isLerp;

        attribute vec2 uv2; // モデルのUV2マップを使用

        varying vec3 vNormal;
        varying vec3 vViewPosition;
        varying vec2 vUv;

        ${normalUnpack()}

        void main() {
            float motion = mod(u_time * u_fps, u_maxMotion);
            float currentFrame = floor(motion);
            float motionLerp = fract(motion);

            // UV計算をgl_VertexIDからuv2に変更
            float texelHeight = 1.0 / u_texSize.y;
            vec2 uv_base = uv2;
            float v_offset = currentFrame * u_column * texelHeight;
            vec2 uv1 = vec2(uv_base.x, uv_base.y + v_offset);

            vec4 tex1 = texture2D(u_posTexture, uv1);
            vec3 vatPos = tex1.rgb;
            vec3 unpacked_normal = normalUnpack(tex1.a);
            vec3 vatNormal = normalize(vec3(unpacked_normal.x, unpacked_normal.z, unpacked_normal.y));

            if (u_isLerp) {
                float nextFrame = ceil(motion);
                if (nextFrame >= u_maxMotion) {
                    nextFrame = 0.0; // Loop back
                }
                float v_offset_next = nextFrame * u_column * texelHeight;
                vec2 uv2_next = vec2(uv_base.x, uv_base.y + v_offset_next);

                vec4 tex2 = texture2D(u_posTexture, uv2_next);
                vec3 vatPos2 = tex2.rgb;
                vec3 unpacked_normal2 = normalUnpack(tex2.a);
                vec3 vatNormal2 = normalize(vec3(unpacked_normal2.x, unpacked_normal2.z, unpacked_normal2.y));

                vatPos = mix(vatPos, vatPos2, motionLerp);
                vatNormal = normalize(mix(vatNormal, vatNormal2, motionLerp));
            }

            // ワールド空間での位置と法線を計算
            vec4 worldPosition = modelMatrix * vec4(vatPos, 1.0);
            vec3 worldNormal = normalize(mat3(modelMatrix) * vatNormal);

            gl_Position = projectionMatrix * viewMatrix * worldPosition;

            vNormal = worldNormal;
            vViewPosition = -worldPosition.xyz; // カメラから頂点へのベクトル
            vUv = uv; // 標準のUVも渡しておく
        }
    `;

    // Custom Fragment Shader (ランバート反射版)
    const customFragmentShader = () => `
        uniform vec3 u_lightDirection; // ライトの方向 (ワールド空間)
        uniform vec3 u_lightColor;     // ライトの色
        uniform vec3 u_ambientColor;   // 環境光の色
        uniform vec3 u_diffuseColor;   // マテリアルの拡散色

        varying vec3 vNormal;
        varying vec3 vViewPosition;
        varying vec2 vUv;

        void main() {
            // 法線を正規化 (補間された法線は長さが1ではない可能性があるため)
            vec3 normal = normalize(vNormal);

            // ライトの方向を正規化
            vec3 lightDirection = normalize(-u_lightDirection);

            // 拡散反射 (Lambertian)
            float diff = max(dot(normal, lightDirection), 0.0);
            vec3 diffuse = u_lightColor * u_diffuseColor * diff;

            // 環境光
            vec3 ambient = u_ambientColor * u_diffuseColor;

            // 最終的な色
            vec3 finalColor = ambient + diffuse;

            gl_FragColor = vec4(finalColor, 1.0);
        }
    `;

    // Custom Fragment Shader (ワイヤーフレーム用)
    const customWireframeFragmentShader = () => `
        void main() {
            gl_FragColor = vec4(0.0, 1.0, 0.0, 1.0); // 緑色で表示
        }
    `;

    // Scene initialization
    window.initClothVatViewer = async (canvasId) => {
        const canvas = document.getElementById(canvasId);
        if (!canvas) return;

        // --- Scene, Camera, Renderer ---
        scene = new THREE.Scene();
        scene.background = new THREE.Color(0);
        const camera = new THREE.PerspectiveCamera(75, canvas.clientWidth / canvas.clientHeight, 0.1, 10000);
        camera.position.z = 5;
        const renderer = new THREE.WebGLRenderer({ canvas: canvas, antialias: true });
        console.log("Is WebGL 2 available?", renderer.capabilities.isWebGL2);
        renderer.setSize(canvas.clientWidth, canvas.clientHeight);

        clock = new THREE.Clock();
        const controls = new THREE.OrbitControls(camera, renderer.domElement);

        // --- Lights ---
        const ambientLight = new THREE.AmbientLight(0xffffff, 0.5);
        scene.add(ambientLight);
        const directionalLight = new THREE.DirectionalLight(0xffffff, 1.0);
        directionalLight.position.set(0, 1, 0);
        scene.add(directionalLight);

        // --- Asset Loading ---
        const [fbx, posTexture] = await Promise.all([
            new THREE.FBXLoader().loadAsync("models/FBX_HQ.fbx"),
            new THREE.EXRLoader().loadAsync("textures/TEX_HQ_dynamic_pos.exr")
        ]);

        posTexture.magFilter = THREE.NearestFilter;
        posTexture.minFilter = THREE.NearestFilter;

        // --- Uniforms (Custom Shader) ---
        const uniforms = {
            u_time: { value: 0.0 },
            u_posTexture: { value: posTexture },
            u_maxMotion: { value: 250.0 }, // Value from old razor page
            u_fps: { value: 30.0 },
            u_texSize: { value: new THREE.Vector2(posTexture.image.width, posTexture.image.height) },
            u_column: { value: 4.0 }, // Derived from old shader logic (frameHeightInPixels = 4.0 / u_texSize.y)
            u_isLerp: { value: true },
            // カスタムシェーダー用のライト情報
            u_lightDirection: { value: new THREE.Vector3(1, 1, 1).normalize() },
            u_lightColor: { value: new THREE.Color(0xffffff) },
            u_ambientColor: { value: new THREE.Color(0x404040) },
            u_diffuseColor: { value: new THREE.Color(0xCCCCCC) }
        };

        // --- Materials (Custom Shader) ---
        const customShaderMaterial = new THREE.ShaderMaterial({
            uniforms: uniforms,
            vertexShader: customVertexShader(),
            fragmentShader: customFragmentShader(),
            side: THREE.DoubleSide,
            lights: false
        });

        const customWireframeMaterial = new THREE.ShaderMaterial({
            uniforms: uniforms,
            vertexShader: customVertexShader(),
            fragmentShader: customWireframeFragmentShader(),
            side: THREE.DoubleSide,
            wireframe: true,
            lights: false
        });

        // Store materials and model for later access
        scene.userData.materials = {
            lambert: customShaderMaterial,
            wireframe: customWireframeMaterial
        };
        const model = fbx;
        scene.userData.clothModel = model;

        // --- Apply default material to model ---
        model.traverse((child) => {
            if (child.isMesh) {
                child.material = customShaderMaterial;
            }
        });

        const box = new THREE.Box3().setFromObject(model);
        const center = box.getCenter(new THREE.Vector3());
        model.position.sub(center);
        scene.add(model);

        const size = box.getSize(new THREE.Vector3());
        const maxDim = Math.max(size.x, size.y, size.z);
        const fov = camera.fov * (Math.PI / 180);
        camera.position.z = Math.abs(maxDim / Math.tan(fov / 2));
        camera.position.z *= 1.5;
        camera.lookAt(model.position);
        controls.target.copy(model.position);
        controls.update();

        // --- Animation Loop ---
        const animate = () => {
            animationFrameId = requestAnimationFrame(animate);
            const deltaTime = clock.getDelta();

            uniforms.u_time.value += deltaTime;

            controls.update();
            renderer.render(scene, camera);
        };
        animate();
    };

    window.disposeClothVatViewer = () => {
        if (animationFrameId) {
            cancelAnimationFrame(animationFrameId);
        }
        if (scene) {
            scene.traverse(object => {
                if (object.isMesh) {
                    if (object.geometry) {
                        object.geometry.dispose();
                    }
                    if (object.material) {
                        if (Array.isArray(object.material)) {
                            object.material.forEach(material => material.dispose());
                        } else {
                            object.material.dispose();
                        }
                    }
                }
            });
            scene = null;
        }
    };

    // --- Material Switcher Function ---
    window.setClothVatViewerMaterial = (name) => {
        if (scene && scene.userData.clothModel && scene.userData.materials) {
            const material = scene.userData.materials[name];
            if (material) {
                scene.userData.clothModel.traverse((child) => {
                    if (child.isMesh) {
                        child.material = material;
                    }
                });
            }
        }
    };

})();
Pages/ClothVatViewer.razor
@page "/cloth-vat-viewer"
@inject IJSRuntime JSRuntime
@implements IDisposable

<h3>Cloth VAT Viewer</h3>

<p>A static FBX model animated by a position texture. Use the radio buttons to switch materials.</p>

<div>
    <div class="form-check form-check-inline">
        <input class="form-check-input" type="radio" name="materialRadio" id="lambertRadio" value="lambert" checked @onchange="OnMaterialChanged" />
        <label class="form-check-label" for="lambertRadio">Lambert</label>
    </div>
    <div class="form-check form-check-inline">
        <input class="form-check-input" type="radio" name="materialRadio" id="wireframeRadio" value="wireframe" @onchange="OnMaterialChanged" />
        <label class="form-check-label" for="wireframeRadio">Wireframe</label>
    </div>
</div>

<canvas id="vat-minimal-fbx-canvas" width="800" height="600" style="border: 1px solid black; margin-top: 10px;"></canvas>

@code {
    protected override async Task OnAfterRenderAsync(bool firstRender)
    {
        if (firstRender)
        {
            await JSRuntime.InvokeVoidAsync("initClothVatViewer",
                "vat-minimal-fbx-canvas");
        }
    }

    private async Task OnMaterialChanged(ChangeEventArgs e)
    {
        var materialName = e.Value.ToString();
        await JSRuntime.InvokeVoidAsync("setClothVatViewerMaterial", materialName);
    }

    public void Dispose()
    {
        JSRuntime.InvokeVoidAsync("disposeClothVatViewer");
    }
}
jsの書き方が大きく変わりましたが、こちらの方がシェーダー書きにとって親しみやすい構成だと思います。
前のプログラムではフラグメントシェーダーを実装できていなかったので陰影の表現が困難でした。
実行
適度な質感が出ているように感じますね。
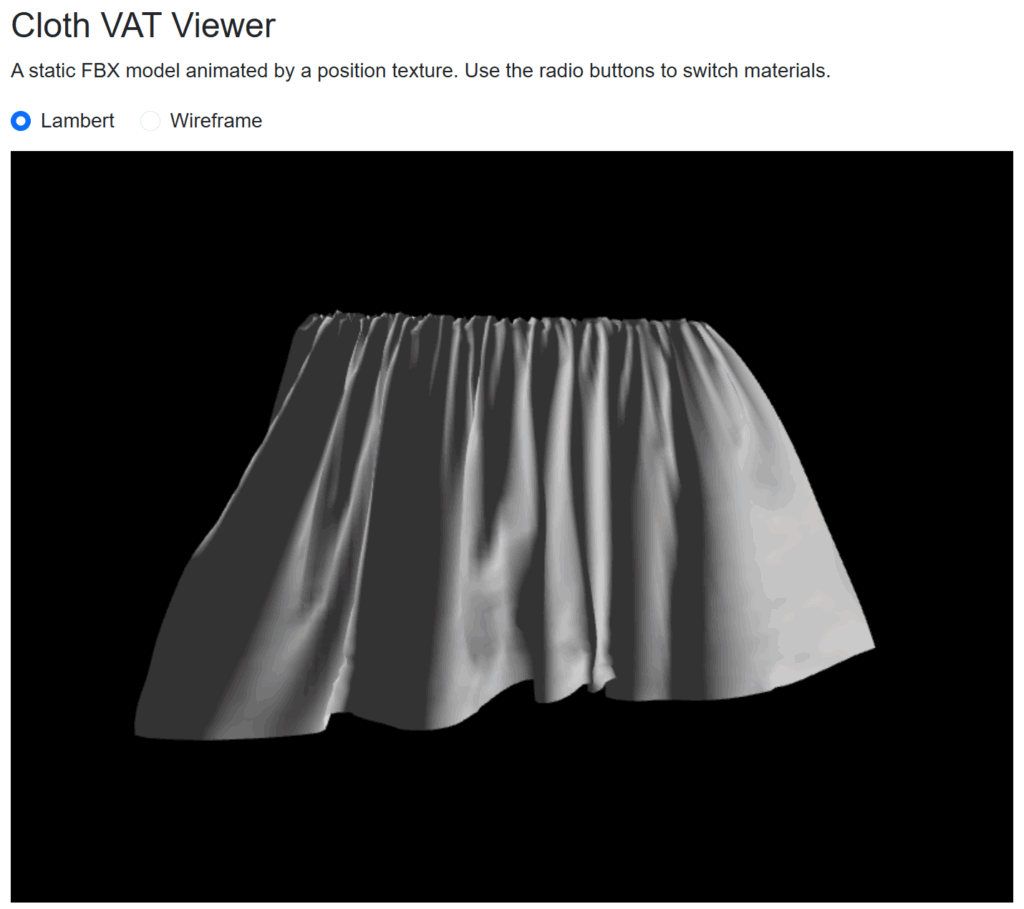
今回のプログラムでは質感表現のほかに、フレーム間の補完、Alphaからの法線情報の取り出しなどが追加されています。
その他シミュレーション
剛体
同じような要領で他のシミュレーションも表示させていきます。
こちらは剛体が砕け散る様です。

流体
こちらは流体の粒が1つにまとまる様です。
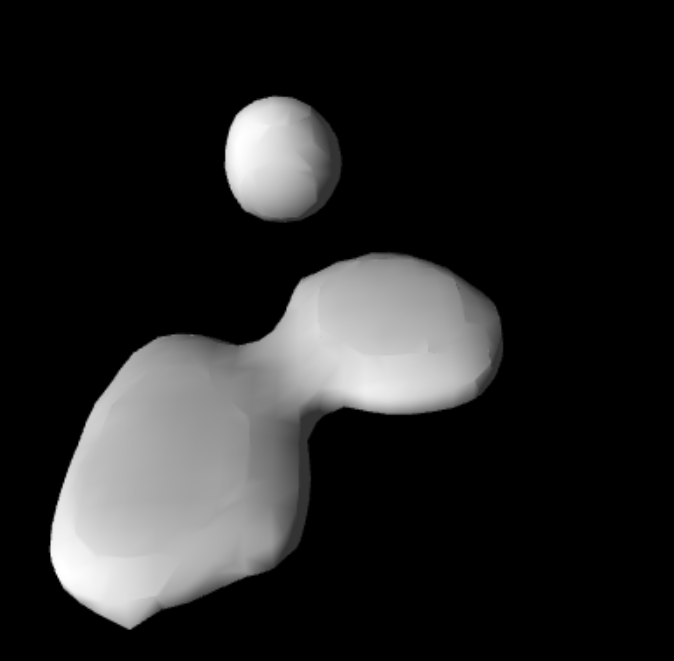
これらを実装するにあたって、UVでのテクスチャ参照から頂点番号から参照する処理に切り替える必要がありました。
以下がその頂点シェーダーです。
uniform float u_time;
uniform sampler2D u_posTexture;
uniform float u_maxMotion;
uniform float u_fps;
uniform vec2 u_texSize;
uniform float u_column;
uniform bool u_isLerp;

varying vec3 vNormal;
varying vec3 vViewPosition;
varying vec2 vUv;

${normalUnpack()}

void main() {
    float motion = mod(u_time * u_fps, u_maxMotion);
    float currentFrame = floor(motion);
    float motionLerp = fract(motion);

    float vertexId = float(gl_VertexID);
    float texelWidth = 1.0 / u_texSize.x;
    float texelHeight = 1.0 / u_texSize.y;

    float u = mod(vertexId, u_texSize.x) * texelWidth;
    float v_base = floor(vertexId / u_texSize.x) * texelHeight;

    float v_offset = floor(motion) * u_column * texelHeight;
    vec2 uv1 = vec2(u, v_base + v_offset + texelHeight); // +texelHeight はテクセル中央を指すため

    vec4 tex1 = texture2D(u_posTexture, uv1);
    vec3 vatPos = tex1.rgb;
    vec3 unpacked_normal = normalUnpack(tex1.a);
    vec3 vatNormal = normalize(vec3(unpacked_normal.x, unpacked_normal.z, unpacked_normal.y));

    if (u_isLerp) {
        float nextFrame = ceil(motion);
        if (nextFrame >= u_maxMotion) {
            nextFrame = 0.0; // Loop back
        }
        float v_offset_next = nextFrame * u_column * texelHeight;
        vec2 uv2 = vec2(u, v_base + v_offset_next + texelHeight);

        vec4 tex2 = texture2D(u_posTexture, uv2);
        vec3 vatPos2 = tex2.rgb;
        vec3 unpacked_normal2 = normalUnpack(tex2.a);
        vec3 vatNormal2 = normalize(vec3(unpacked_normal2.x, unpacked_normal2.z, unpacked_normal2.y));

        vatPos = mix(vatPos, vatPos2, motionLerp);
        vatNormal = normalize(mix(vatNormal, vatNormal2, motionLerp));
    }

    // ワールド空間での位置と法線を計算
    vec4 worldPosition = modelMatrix * vec4(vatPos, 1.0);
    vec3 worldNormal = normalize(mat3(modelMatrix) * vatNormal);

    gl_Position = projectionMatrix * viewMatrix * worldPosition;

    vNormal = worldNormal;
    vViewPosition = -worldPosition.xyz; // カメラから頂点へのベクトル
    vUv = uv; // 標準のUVも渡しておく
}
gl_VertexIDで頂点番号が取得できるようですね。
GitHub Action/Pages
「Blazor WebAssemblyスタンドアロンアプリ」で作成されたWebアプリは静的であるためGitHub Pagesにアップロードして全世界に公開することができます。
ルートパスの変更
wwwroot/index.html
<!-- 変更前 -->
<base href="/" />

<!-- 変更後 (例: リポジトリ名が "Three_VAT" の場合) -->
<base href="/Three_VAT/" />
GitHub Actionワークフローの作成
続いてGitHubにPullしたときに自動でビルド、デプロイしてくれるようにGitHbu Actionのワークフローを書いていきます。
プロジェクトのルートフォルダに.github/workflows/deploy.ymlを作成します。
Three_VAT/
├── .github/
│  └── workflows/
│     └── deploy.yml <-- このファイルを作成
├── Three_VAT.sln
└── Three_VAT/
  ├── wwwroot/
  └── ...
.github/workflows/deploy.yml
# GitHub Pagesへの静的コンテンツのデプロイを許可する
permissions:
  contents: read
  pages: write
  id-token: write

name: Deploy to GitHub Pages

# mainブランチにプッシュされたときに、このワークフローを実行する
on:
  push:
    branches: [ "main" ]

jobs:
  build:
    runs-on: ubuntu-latest
    steps:
      - name: Checkout
        uses: actions/checkout@v4

      - name: Setup .NET
        uses: actions/setup-dotnet@v4
        with:
          # ★★★ .NET 9.0 Preview を使用する設定 ★★★
          dotnet-version: '9.0.x'
          include-prerelease: true

      - name: Publish .NET Project
        run: dotnet publish Three_VAT/Three_VAT.csproj -c Release -o release --nologo
        # ★★★ "Three_VAT.csproj" を、あなたのプロジェクトの .csproj ファイル名に書き換えてください ★★★

      - name: Upload artifact
        uses: actions/upload-pages-artifact@v3
        with:
          path: release/wwwroot

  deploy:
    needs: build
    runs-on: ubuntu-latest
    environment:
      name: github-pages
      url: ${{ steps.deployment.outputs.page_url }}
    steps:
      - name: Deploy to GitHub Pages
        id: deployment
        uses: actions/deploy-pages@v4
実行
これで準備は完了です、コミットしてPullしましょう。
するとActionタブでActionが実行されていることがわかります。
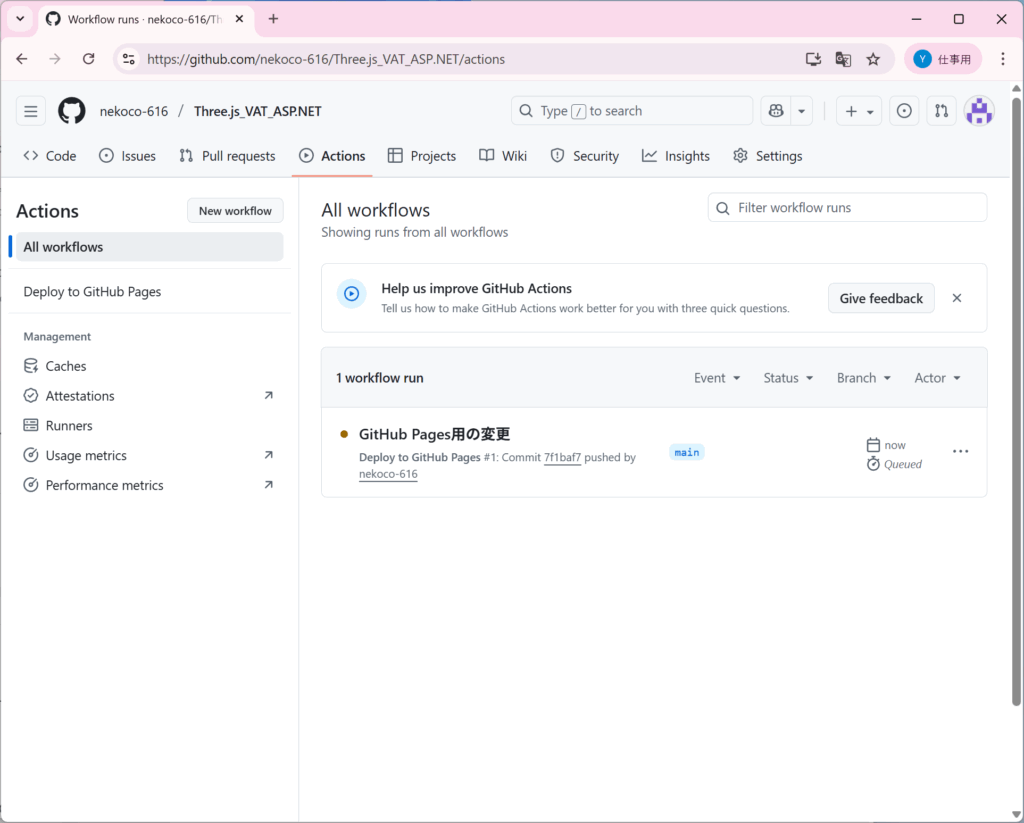
成功すると次のような表示になり、deployに書かれているURLにアクセスするとページが見れます。

無事に他の人にも公開することができました。
こちらでもVATはしっかり動いています。

今回作成したページを全部用意しているので、ぜひ実際に動いているところを見てみてください。
Three_VAT
Three.js参考記事
今回AIだけで開発していると致命的な課題に出くわすことがありました。
そこで先行情報を調べたところ、以下の記事が見つかりました。
webGLでVertex Animation Textureをやる #JavaScript – Qiita
こちらの情報を参考に陰影処理などを開発しました。
おわりに
今回はThree.jsでVATシェーダーを書いてみました。
この技術が直接Webページのデザインに関わることは少ないとは思いますが、自分としては良い学習になったと感じています。
投稿者プロフィール
最新の投稿
 【AI】2025年12月26日RAG改良手法の学習
 Python2025年12月25日StreamlitでRAGを作ってみた
 Python2025年12月23日Pythonを学習するにあたってやったこと
- 未分類2025年11月28日『Webを支える技術』を読んだ学び