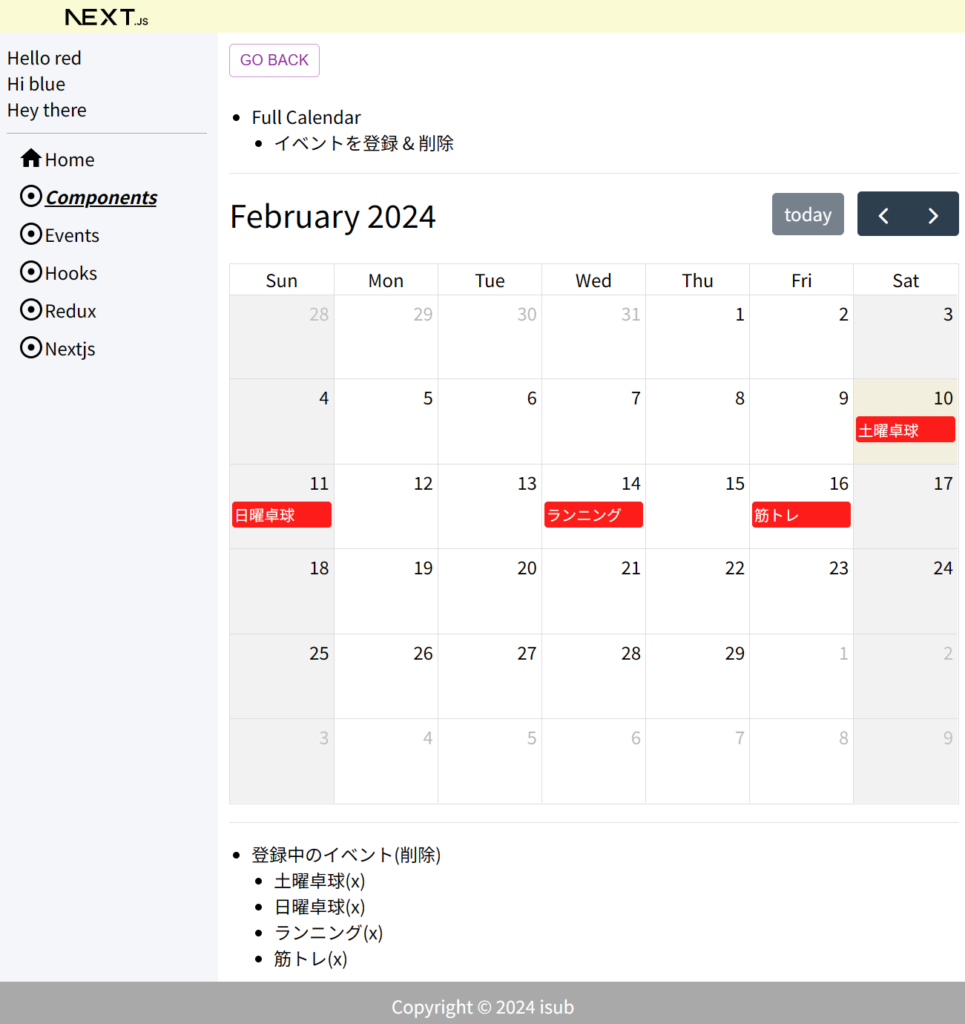
1. 概要
前回はFirestoreの使い方についてでした。今回はFullCalendarの使い方についてです。
既に弊社の平山さんがいくつかのTipsを書いてますが、自分も触ってみたので軽く書きます。
対象としては開発を1年程やってて自分で最初から開発してみたい方になります。そのため細かい用語などの説明はしません。
2. nodeのインストール
こちらを参考
3. プロジェクトを作成
こちらを参考
4. 必要なライブラリをインストール
こちらを参考
npm install --save @fullcalendar/core @fullcalendar/react @fullcalendar/daygrid @fullcalendar/interaction5. ソースコード
※前回より差分のみを記載
5-1-1. src/app/components/component10/client-page.tsx
"use client";

import { useState } from "react";
import { EventInput, EventClickArg } from "@fullcalendar/core";
import FullCalendar from "@fullcalendar/react";
import dayGridPlugin from "@fullcalendar/daygrid";
import interactionPlugin, { DateClickArg } from "@fullcalendar/interaction";
import Divider from "@mui/material/Divider";

let eventGuid: number = 0;

const ClientPage = () => {
  const [events, setEvents] = useState<EventInput[]>([]);

  const addEvent = (id: string, title: string, date: string) => {
    const newEvents: EventInput[] = [...events];
    newEvents.push({ id, title, date, color: "red" });
    setEvents(newEvents);
  };

  const removeEvent = (id: string) => {
    const newEvents: EventInput[] = events.filter(
      (e: EventInput) => e.id != id
    );
    setEvents(newEvents);
  };

  const handleDateClick = (clickInfo: DateClickArg) => {
    const title: string | null = prompt(
      "Please enter a new title for your event"
    );

    const eventId: string = createEventId();
    const calendarApi = clickInfo.view.calendar;
    calendarApi.unselect();
    if (title) {
      calendarApi.addEvent({
        id: eventId,
        title,
        start: clickInfo.dateStr,
        end: clickInfo.dateStr,
        allDay: clickInfo.allDay,
      });
      addEvent(eventId, title, clickInfo.dateStr);
    }
  };

  const handleEventClick = (clickInfo: EventClickArg) => {
    clickInfo.event.remove();
    removeEvent(clickInfo.event.id);
  };

  const createEventId = (): string => {
    return `event${++eventGuid}`;
  };

  return (
    <>
      <FullCalendar
        plugins={[dayGridPlugin, interactionPlugin]}
        initialView="dayGridMonth"
        events={events}
        selectable={true}
        dayMaxEvents={true}
        businessHours={{ daysOfWeek: [1, 2, 3, 4, 5] }}
        dateClick={(e: DateClickArg) => {
          if (e.dayEl.classList.contains("fc-day-past")) return;
          handleDateClick(e);
        }}
        eventClick={(e: EventClickArg) => handleEventClick(e)}
      />
      <Divider sx={{ marginTop: 2, marginBottom: 2 }} />
      <ul>
        <li>登録中のイベント(削除)</li>
        <ul>
          {events.map((e: EventInput) => (
            <li key={e.id}>
              {e.title}
              <span onClick={() => removeEvent(e.id!)}>(x)</span>
            </li>
          ))}
        </ul>
      </ul>
    </>
  );
};

export default ClientPage;
5-1-2. src/app/components/component10/page.module.scss
.component {
  & ul {
    margin-left: 20px;
    & li {
      list-style: disc;
    }
  }
}
5-1-3. src/app/components/component10/page.tsx
import Divider from "@mui/material/Divider";
import GoBack from "@/lib/components/go-back";
import scss from "./page.module.scss";
import ClientPage from "./client-page";

const Component10 = () => {
  return (
    <div className={scss.component}>
      <GoBack />
      <br />
      <br />
      <ul>
        <li>Full Calendar</li>
        <ul>
          <li>イベントを登録 & 削除</li>
        </ul>
      </ul>
      <Divider sx={{ marginTop: 2, marginBottom: 2 }} />
      <ClientPage />
    </div>
  );
};

export default Component10;
5-1-4. src/app/components/page.tsx
"use client";

import React from "react";
import { Link } from "@mui/material";

import scss from "./page.module.scss";

const Components = () => {
  return (
    <div className={scss.components}>
      <ul>
        <li>
          <Link href="/components/component01" underline="hover">
            Component01
          </Link>
        </li>
        <li>
          <Link href="/components/component02" underline="hover">
            Component02
          </Link>
        </li>
        <li>
          <Link href="/components/component03" underline="hover">
            Component03
          </Link>
        </li>
        <li>
          <Link href="/components/component04" underline="hover">
            Component04
          </Link>
        </li>
        <li>
          <Link href="/components/component05" underline="hover">
            Component05
          </Link>
        </li>
        <li>
          <Link href="/components/component06" underline="hover">
            Component06
          </Link>
        </li>
        <li>
          <Link href="/components/component07" underline="hover">
            Component07
          </Link>
        </li>
        <li>
          <Link href="/components/component08" underline="hover">
            Component08
          </Link>
        </li>
        <li>
          <Link href="/components/component09" underline="hover">
            Component09
          </Link>
        </li>
        <li>
          <Link href="/components/component10" underline="hover">
            Component10
          </Link>
        </li>
      </ul>
    </div>
  );
};

export default Components;
6. サーバーを起動
npm run dev7. ブラウザで確認
- http://localhost:3000
8. ディレクトリの構造
省略9. 備考
今回はFullCalendarの使い方についてでした。
10. 参考
- Docs | Next.js (nextjs.org)
- Quick Start – React
- Getting Started with Redux | Redux
- Getting Started with React Redux | React Redux (react-redux.js.org)
- Material UI: React components based on Material Design (mui.com)
- FullCalendar – JavaScript Event Calendar
投稿者プロフィール
-
開発好きなシステムエンジニアです。
卓球にハマってます。