1. 概要
今回はGraphQLでAPIを実装する内容となります。
対象としては開発を1年程やってて自分で最初から開発してみたい方になります。そのため細かい用語などの説明はしません。
2. GraphQLとは
- A query language for your API
GraphQLはAPIのためのクエリ言語であり、既存のデータでクエリを実行するためのランタイムです。GraphQLはAPI内のデータについて完全で理解しやすい説明を提供し、クライアントに必要なものだけを要求する力を与え、時間の経過とともにAPIを進化させることを容易にし、強力な開発者ツールを可能にします。
GraphQL | A query language for your API
3. Apollo Serverとは
Apollo Serverはオープンソースで仕様に準拠したGraphQLサーバーであり、Apollo Clientを含むあらゆるGraphQLクライアントと互換性があります。これは、あらゆるソースからのデータを使用できる、プロダクションレディで自己文書化されたGraphQL APIを構築する最良の方法です。
Introduction to Apollo Server – Apollo GraphQL Docs
4. nodeのインストール
こちらを参考
ここからは公式サイトの手順に従い、やってみます。
5. プロジェクトを作成
mkdir graphql-server-examplecd graphql-server-example6. 必要なライブラリをインストール
npm install @apollo/server graphql7. TypeScriptでセットアップ
mkdir srctouch src/index.tsnpm install ts-nodenpm install --save-dev typescript @types/nodenpx tsc --init8. 設定ファイルの編集
8-1. tsconfig.json
※差し替え
{
  "compilerOptions": {
    "rootDirs": ["src"],
    "outDir": "dist",
    "lib": ["es2020"],
    "target": "es2020",
    "module": "esnext",
    "moduleResolution": "node",
    "esModuleInterop": true,
    "types": ["node"]
  }
}
8-2. package.json
※追加
{
  "type": "module",
  "scripts": {
    "compile": "tsc",
    "start": "npm run compile && node ./dist/index.js"
  },
  "dependencies": {
    "@apollo/server": "^4.7.5",
    "graphql": "^16.7.1",
    "ts-node": "^10.9.1"
  },
  "devDependencies": {
    "@types/node": "^20.4.0",
    "typescript": "^5.1.6"
  }
}
9. GraphQLスキーマを定義
※src/index.ts
import { ApolloServer } from '@apollo/server';
import { startStandaloneServer } from '@apollo/server/standalone';

const typeDefs = `#graphql
  type Book {
    title: String
    author: String
  }

  type Query {
    books: [Book]
  }
`;
10. Data Setを定義
※src/index.ts
const books = [
  {
    title: 'The Awakening',
    author: 'Kate Chopin',
  },
  {
    title: 'City of Glass',
    author: 'Paul Auster',
  },
];
11. Resolverを定義
※src/index.ts
const resolvers = {
  Query: {
    books: () => books,
  },
};
12. ApolloServerのインスタンスを作成
※src/index.ts
const server = new ApolloServer({
  typeDefs,
  resolvers,
});

const { url } = await startStandaloneServer(server, {
  listen: { port: 4000 },
});

console.log(`🚀  Server ready at: ${url}`);
13. 全体のソースコード
※src/index.ts
import { ApolloServer } from '@apollo/server';
import { startStandaloneServer } from '@apollo/server/standalone';

const typeDefs = `#graphql
  type Book {
    title: String
    author: String
  }

  type Query {
    books: [Book]
  }
`;

const books = [
  {
    title: 'The Awakening',
    author: 'Kate Chopin',
  },
  {
    title: 'City of Glass',
    author: 'Paul Auster',
  },
];

const resolvers = {
  Query: {
    books: () => books,
  },
};

const server = new ApolloServer({
  typeDefs,
  resolvers,
});

const { url } = await startStandaloneServer(server, {
  listen: { port: 4000 },
});

console.log(`🚀  Server ready at: ${url}`);
14. サーバーを起動
npm start$ npm start
> start
> npm run compile && node ./dist/index.js
> compile
> tsc
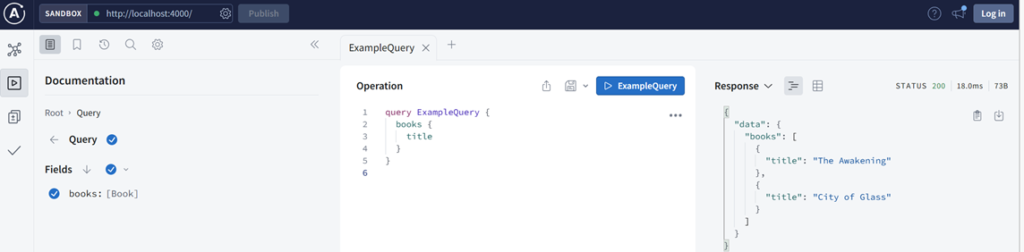
🚀 Server ready at: http://localhost:4000/15. クエリを実行
- http://localhost:4000
15-1-1. Request
query ExampleQuery {
  books {
    title
  }
}
15-1-2. Response
{
  "data": {
    "books": [
      {
        "title": "The Awakening"
      },
      {
        "title": "City of Glass"
      }
    ]
  }
}
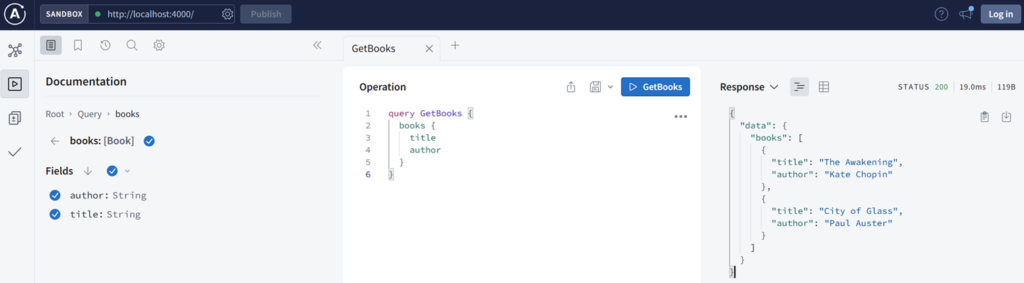
15-2-1. Request
query GetBooks {
  books {
    title
    author
  }
}
15-2-2. Response
{
  "data": {
    "books": [
      {
        "title": "The Awakening",
        "author": "Kate Chopin"
      },
      {
        "title": "City of Glass",
        "author": "Paul Auster"
      }
    ]
  }
}
16. ディレクトリの構造
.
├── dist
│   └── index.js
├── node_modules
├── package-lock.json
├── package.json
├── src
│   └── index.ts
└── tsconfig.json
17. 備考
今回は公式サイトの手順に従い、Apollo Serverを使用してGraphQLのAPIを経由しデータを取得するシンプルな内容でした。
18. 参考
投稿者プロフィール
-
開発好きなシステムエンジニアです。
卓球にハマってます。