1. 概要
上記、記事ではBack-End側のAPI開発の内容でした。今回は上記APIにアクセスし、データを取得するFront-End側の開発をする内容となります。Next.jsやApollo Clientを使い、GraphQLよりデータを取得してみます。
対象としては開発を1年程やってて自分で最初から開発してみたい方になります。そのため細かい用語などの説明はしません。
2. Back-End側のAPI開発
こちらを参考
3. nodeのインストール
こちらを参考
4. DockerでMySQLを起動
5. Back-End側のサーバーを起動
6. プロジェクトを作成
npx create-next-app@latest nextjs-with-apollo-client --tscd nextjs-with-apollo-client7. 必要なライブラリをインストール
npm install graphql @apollo/client @as-integrations/nextnpm install -D @graphql-codegen/cli @graphql-codegen/client-preset @graphql-codegen/typescriptcode .8. GraphQL Code Generatorの設定ファイルを生成
8-1. codegen.ts
npx graphql-code-generator init Welcome to GraphQL Code Generator!
Answer few questions and we will setup everything for you.
? What type of application are you building? Application built with React
? Where is your schema?: (path or url) http://localhost:4000
? Where are your operations and fragments?: src/**/*.tsx
? Where to write the output: ./apollo/__generated__/client/
? Do you want to generate an introspection file? No
? How to name the config file? codegen.ts
? What script in package.json should run the codegen? codegen
Fetching latest versions of selected plugins...
Config file generated at codegen.ts
$ npm install
To install the plugins.
$ npm run codegen
To run GraphQL Code Generator.- 上記コマンド実行で「codegen.ts」が生成される
- 「ignoreNoDocuments: true」を追加
import type { CodegenConfig } from "@graphql-codegen/cli";

const config: CodegenConfig = {
  overwrite: true,
  schema: "http://localhost:4000",
  documents: "src/**/*.tsx",
  generates: {
    "./apollo/__generated__/client/": {
      preset: "client",
      plugins: [],
    },
  },
  ignoreNoDocuments: true,
};

export default config;9. 設定ファイルの編集
9-1. package.json
※「codegen」が追加されてる
{
  "name": "next-with-apollo-client",
  "version": "0.1.0",
  "private": true,
  "scripts": {
    "dev": "next dev",
    "build": "next build",
    "start": "next start",
    "lint": "next lint",
    "codegen": "graphql-codegen --config codegen.ts"
  },
  "dependencies": {
    "@apollo/client": "^3.7.17",
    "@as-integrations/next": "^2.0.1",
    "@types/node": "20.4.5",
    "@types/react": "18.2.17",
    "@types/react-dom": "18.2.7",
    "autoprefixer": "10.4.14",
    "eslint": "8.45.0",
    "eslint-config-next": "13.4.12",
    "graphql": "^16.7.1",
    "next": "13.4.12",
    "postcss": "8.4.27",
    "react": "18.2.0",
    "react-dom": "18.2.0",
    "tailwindcss": "3.3.3",
    "typescript": "5.1.6"
  },
  "devDependencies": {
    "@graphql-codegen/cli": "^5.0.0",
    "@graphql-codegen/client-preset": "^4.1.0",
    "@graphql-codegen/typescript": "^4.0.1"
  }
}
10. 型を自動生成するコマンドを実行
10-1. 上記追加したコマンドの実行
npm run codegen11. Apollo Clientの実装
11-1. apollo/client.ts
import { ApolloClient, InMemoryCache } from "@apollo/client";

export const client = new ApolloClient({
  uri: "http://localhost:4000",
  cache: new InMemoryCache(),
});
12. Apollo Providerの実装
12-1. src/app/providers/WithApolloProvider.tsx
"use client";

import { ApolloProvider } from "@apollo/client";
import { client } from "../../../apollo/client";
import React from "react";

export const WithApolloProvider = ({ children }: React.PropsWithChildren) => {
  return <ApolloProvider client={client}>{children}</ApolloProvider>;
};
13. APIにアクセスし、ユーザーデータを取得
13-1. src/app/components/user/GetUsers.tsx
"use client";

import { useQuery, gql } from "@apollo/client";
import { User } from "../../../../apollo/__generated__/client/graphql";

const ALL_USERS = gql(`query Users($published: Boolean!) {
  users(published: $published) {
    id
    name
    email
    profile {
      id
      bio
    }
    posts {
      id
      title
      content
      authorId
      published
    }
  }
}`);

export const GetUsers = () => {
  const { data, loading, error } = useQuery(ALL_USERS, {
    variables: { published: false },
  });
  if (loading) return <div>LOADING...</div>;
  if (error) return <div>{error.message}</div>;
  return (
    <div>
      <ul>
        {data.users.map((user: User, idx: number) => (
          <li key={String(idx)}>
            {user.name} ({user.email})
          </li>
        ))}
      </ul>
    </div>
  );
};
14. 画面表示
14-1. src/app/page.tsx
import { WithApolloProvider } from "./providers/WithApolloProvider";
import { GetUsers } from "./components/user/GetUsers";

const Home = () => {
  return (
    <main>
      <WithApolloProvider>
        <GetUsers />
      </WithApolloProvider>
    </main>
  );
};

export default Home;
15. Front-End側のサーバーを起動
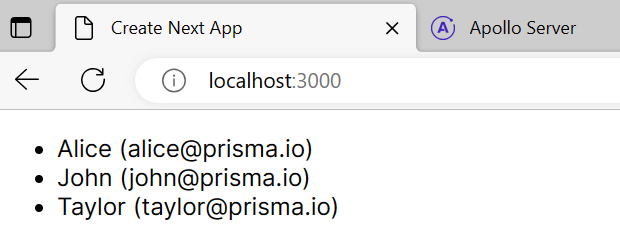
npm run dev16. ブラウザで確認
- http://localhost:3000
17. ディレクトリの構造
.
├── README.md
├── apollo
│   ├── __generated__
│   │   └── client
│   │       ├── fragment-masking.ts
│   │       ├── gql.ts
│   │       ├── graphql.ts
│   │       └── index.ts
│   └── client.ts
├── codegen.ts
├── next-env.d.ts
├── next.config.js
├── package-lock.json
├── package.json
├── postcss.config.js
├── public
│   ├── next.svg
│   └── vercel.svg
├── src
│   └── app
│       ├── components
│       │   └── user
│       │       └── GetUsers.tsx
│       ├── favicon.ico
│       ├── globals.css
│       ├── layout.tsx
│       ├── page.tsx
│       └── providers
│           └── WithApolloProvider.tsx
├── tailwind.config.js
└── tsconfig.json

9 directories, 22 files
18. 備考
Next.jsでApollo Clientを使い、GraphQLのAPIにアクセスし、データを取得する内容でした。
19. 参考
- Docs | Next.js (nextjs.org)
- Get started with Apollo Client – Apollo GraphQL Docs
- Next.js + Apollo でシュッとGraphQLを始める (zenn.dev)
投稿者プロフィール
-
開発好きなシステムエンジニアです。
卓球にハマってます。
最新の投稿
 【AWS】2024年4月28日【AWS】Amazon DynamoDBを使ってみる(CLI、PartiQL)
- 【AWS】2024年4月27日【AWS】Amazon DynamoDBを使ってみる(CLI、API)
- 【AWS】2024年4月25日【AWS】Amazon DynamoDBを使ってみる(Management Console)
- 【AWS】2024年4月22日【AWS】API Gatewayを使ってみる