ルート表示のためのAPIについて
GoogelMapで頼る機能といえは何かといえば、ナビ機能でないかと思います。
自分のアプリ内では実装していませんが、ルート表示の機能を使用してみたいと思います。
使用するAPIはDirections APIです。
こちらもいつも通り、発行されているAPIキーに紐づけます。
方法は前回までのものと変わりません。

APIのリクエスト・レスポンスについて
リクエストURLでは、APIキー、出発地点と目標地点が必須となります。
まずは試しに直接打ってみましょう。
https://maps.googleapis.com/maps/api/directions/json?destination=目標地点&origin=出発地点&key=APIキー
destination=目標地点
origin=出発地点
key=発行したAPIキー
試しに箱根駅伝よろしく、大手町から芦ノ湖を目指します。
https://maps.googleapis.com/maps/api/directions/json?destination=Ashinoko&origin=Otemachi&key=発行したAPIキーレスポンスの抜粋です。
曲がる場所や分岐毎にデータが入ってくる事がわかります。
地図的にはこれをプロットしていく事で道順を描画しているんだと思います。
{
    geocoded_waypoints:[]
    routes:[
        0:{
  (中略)
            }
            copyrights:Map data ©2023
            legs:[
                0:{
                    distance:{
                        text:101 km
                        value:100691
                    }
                    duration:{
                        text:1時間41分
                        value:6089
                    }
                    end_address:日本、〒250-0522 神奈川県足柄下郡箱根町元箱根 芦ノ湖
                    end_location:{
                        lat:35.2135179
                        lng:139.0083016
                    }
                    start_address:日本、〒100-0004 東京都千代田区大手町
                    start_location:{
                        lat:35.6867879
                        lng:139.7644885
                    }
                    steps:[
                        0:{
                            distance:{
                                text:71 m
                                value:71
                            }
                            duration:{
                                text:1分
                                value:16
                            }
                            end_location:{
                                lat:35.68691159999999
                                lng:139.7637206
                            }
                            html_instructions:<b>西</b>に進んで<b>日比谷通り</b>/<wbr/><b>都道403号</b>に向かう
                            polyline:{
                                points:mayxEaw`tYEh@ALO`B
                            }
                            start_location:{
                                lat:35.6867879
                                lng:139.7644885
                            }
                            travel_mode:DRIVING
                        }
                        1:{
                            distance:{
                                text:0.3 km
                                value:259
                            }
                            duration:{
                                text:1分
                                value:54
                            }
                            end_location:{
                                lat:35.6890985
                                lng:139.7641431
                            }
                            html_instructions:<b>右折</b>して<b>日比谷通り</b>/<wbr/><b>都道403号</b>に入る
                            maneuver:turn-right
                            polyline:{
                                points:ebyxEgr`tYEZy@OgAQo@MOA}@QC?SEkB[CAE?a@G
                            }
                            start_location:{
                                lat:35.68691159999999
                                lng:139.7637206
                            }
                            travel_mode:DRIVING
                        }
                        2:{
                            distance:{
                                text:0.5 km
                                value:463
                            }
                            duration:{
                                text:1分
                                value:43
                            }
                            end_location:{
                                lat:35.6911475
                                lng:139.7598905
                            }
                            html_instructions:<b>左折</b>して <b>北池袋</b>/<wbr/><b>中央自動車道</b> 方面の <b>首都高速都心環状線</b>/<wbr/><b>C1</b> に入る<div style="font-size:0.9em">有料区間</div>
                            maneuver:ramp-left
                            ....
ライブラリの追加と実装の修正について
Jsonを自力でパースして表示させることも可能ですが、簡単にライブラリーを使用します。
pubspec.yamlに追加します。
flutter_polyline_points: ^1.0.0メインクラスは以下のようにします。
シンプルにするため動作する範囲で色々省いています。
import 'package:flutter/material.dart';
import 'package:flutter_polyline_points/flutter_polyline_points.dart';
import 'package:google_maps_flutter/google_maps_flutter.dart';
import 'package:geolocator/geolocator.dart';

void main() async {
  WidgetsFlutterBinding.ensureInitialized();

  Future(() async {
    LocationPermission permission = await Geolocator.checkPermission();
    if (permission == LocationPermission.denied) {
      await Geolocator.requestPermission();
    }
  });
  runApp(const MyApp());
}

class MyApp extends StatefulWidget {
  const MyApp({Key? key}) : super(key: key);

  @override
  _MyAppState createState() => _MyAppState();
}

class _MyAppState extends State<MyApp> {
  static const String API_KYE = "発行したAPIキー";

  late GoogleMapController mapController;
  final Set<Polyline> _polyline = {};

  // 表示初期値
  final LatLng _center = const LatLng(35.43821358266387, 139.39460061272635);

  // 大手町
  final LatLng start = const LatLng(35.68724435925166, 139.76440491475265);
  // 芦ノ湖
  final LatLng destination = const LatLng(35.18918280607608, 139.0247963107001);

  @override
  void initState() {
    super.initState();
    _getRoutes();
  }

  // ルート表示データ取得
  Future<void> _getRoutes() async {
    List<LatLng> _points = await _createPolyline();
    setState(() {
      _polyline.add(Polyline(
          polylineId: const PolylineId("Route"),
          visible: true,
          color: Colors.blue,
          width: 5,
          points: _points));
    });
  }

  void _onMapCreated(GoogleMapController controller) async {
    mapController = controller;
  }

  // マップの作成
  Widget _createMap() {
    return GoogleMap(
        mapType: MapType.normal,
        onMapCreated: _onMapCreated,
        initialCameraPosition: CameraPosition(target: _center, zoom: 9),
        polylines: _polyline,
        markers: {
          Marker(markerId: const MarkerId("origin"), position: start),
          Marker(
              markerId: const MarkerId("destination"), position: destination)
        });
  }

  // ルート表示
  Future<List<LatLng>> _createPolyline() async {
    List<LatLng> polylineCoordinates = [];
    PolylinePoints polylinePoints = PolylinePoints();
    PolylineResult result = await polylinePoints.getRouteBetweenCoordinates(
      API_KYE,
      PointLatLng(start.latitude, start.longitude),
      PointLatLng(destination.latitude, destination.longitude),
    );

    if (result.points.isNotEmpty) {
      result.points.forEach((PointLatLng point) {
        polylineCoordinates.add(LatLng(point.latitude, point.longitude));
      });
    }
    return polylineCoordinates;
  }

  @override
  Widget build(BuildContext context) {
    return MaterialApp(
      home: Scaffold(
        appBar: AppBar(
          title: const Text('Maps Sample App'),
          backgroundColor: Colors.green[700],
        ),
        body: _createMap(),
      ),
    );
  }
}
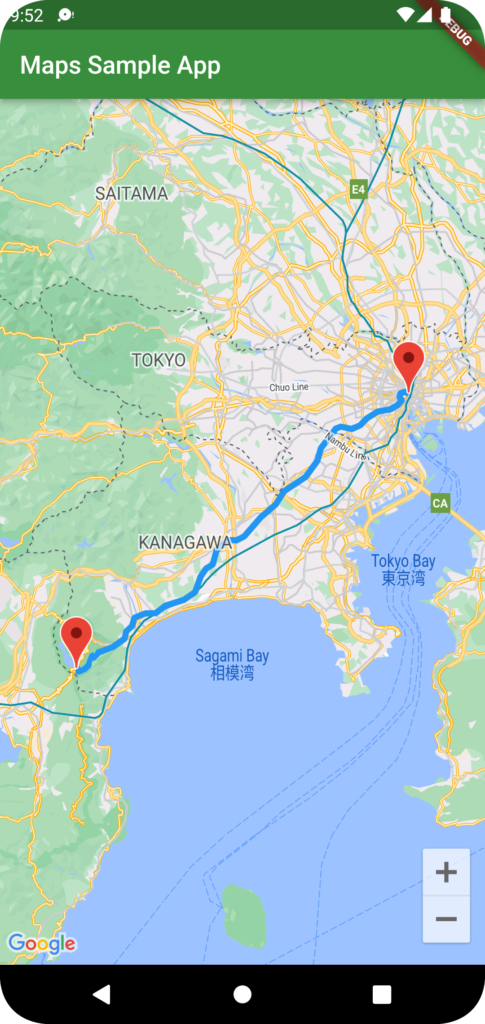
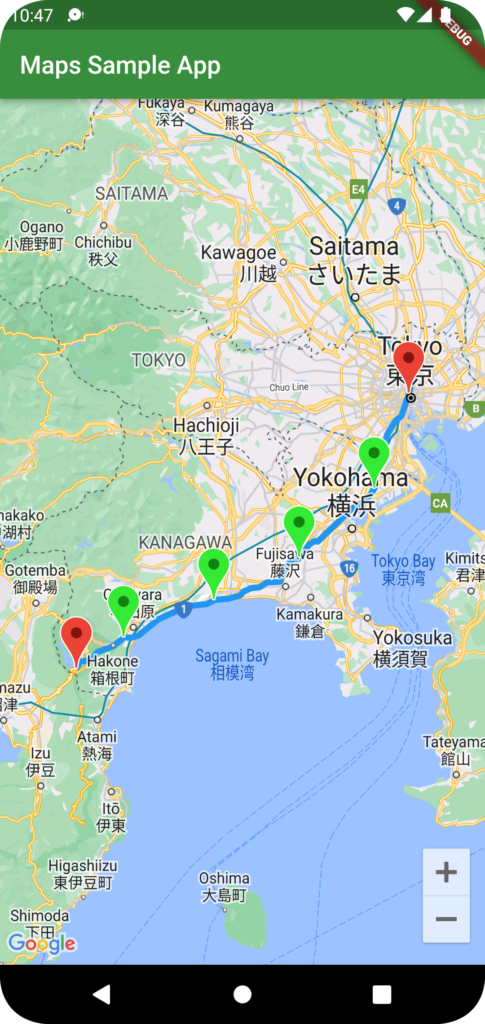
お分かりと思いますが、ルートは駅伝のそれとはだいぶ違います。
理由としては、中継所を通る設定がなく、車移動+有料道路ありに設定されているためです。
オプションの設定について
ルートはオプションで調整が可能です。
オプションには出発時間や有料道路の使用、渋滞情報から最適化を行うか?などがあります。
※移動手段には電車乗り換えモードがありますが、日本では使用できない模様です。
例えば、徒歩移動・経由地を設定します。
座標情報とリクエストURLを作成している部分を修正してみました。
  // 大手町
  final LatLng start = const LatLng(35.68724435925166, 139.76440491475265);
  // 芦ノ湖
  final LatLng destination = const LatLng(35.18918280607608, 139.0247963107001);
  // 中継所
  final LatLng first = const LatLng(35.515810099999996, 139.68752933068856);
  final LatLng second = const LatLng(35.389956680242875, 139.5204141601423);
  final LatLng third = const LatLng(35.313836301020466, 139.33102678438047);
  final LatLng fourth = const LatLng(35.24576650112582, 139.13005552181303);

...(中略)

  // マップの作成
  Widget _createMap() {
    return GoogleMap(
        mapType: MapType.normal,
        onMapCreated: _onMapCreated,
        initialCameraPosition: CameraPosition(target: _center, zoom: 9),
        polylines: _polyline,
        markers: {
          Marker(markerId: const MarkerId("origin"), position: start),
          Marker(
              markerId: const MarkerId("destination"), position: destination),
          Marker(
              markerId: const MarkerId("tsurumi"),
              position: first,
              icon: BitmapDescriptor.defaultMarkerWithHue(120.0)),
          Marker(
              markerId: const MarkerId("totsuka"),
              position: second,
              icon: BitmapDescriptor.defaultMarkerWithHue(120.0)),
          Marker(
              markerId: const MarkerId("hiratsuka"),
              position: third,
              icon: BitmapDescriptor.defaultMarkerWithHue(120.0)),
          Marker(
              markerId: const MarkerId("odawara"),
              position: fourth,
              icon: BitmapDescriptor.defaultMarkerWithHue(120.0)),
        });
  }

...(中略)

  // ルート表示
  Future<List<LatLng>> _createPolyline() async {
    List<LatLng> polylineCoordinates = [];
    // 通過地点を追加
    List<PolylineWayPoint> polylineWayPoints = [
      PolylineWayPoint(location: '${first.latitude},${first.longitude}'),
      PolylineWayPoint(location: '${second.latitude},${second.longitude}'),
      PolylineWayPoint(location: '${third.latitude},${third.longitude}'),
      PolylineWayPoint(location: '${fourth.latitude},${fourth.longitude}'),
    ];
    PolylinePoints polylinePoints = PolylinePoints();
    PolylineResult result = await polylinePoints.getRouteBetweenCoordinates(
      API_KYE,
      PointLatLng(start.latitude, start.longitude),
      PointLatLng(destination.latitude, destination.longitude),
      // リクエストのオプションを追加
      wayPoints: polylineWayPoints,
      travelMode: TravelMode.walking,
    );

    if (result.points.isNotEmpty) {
      result.points.forEach((PointLatLng point) {
        polylineCoordinates.add(LatLng(point.latitude, point.longitude));
      });
    }
    return polylineCoordinates;
  }
APIに関する備考について
オプション設定で結構近くなったと思います。
もう少し近づけようと思った場合は、経由地を細かく設定してもいいのですが、11以上の経由地を設定した場合は、API無料枠の消費が大きくなるとのことですので注意です。
また、今回はDestinationのAPIですが、新たにRoutesAPIというものも発表されています。現在プレビュー版(一般提供前)ですが、気になった方はぜひ使ってみてください。
今回は以上です。
ありがとうございました。